CRUSH SCHOOL

I blog on Brain-Based Learning, Metacognition, EdTech, and Social-Emotional Learning. I am the author of the Crush School Series of Books, which help students understand how their brains process information and learn. I also wrote The Power of Three: How to Simplify Your Life to Amplify Your Personal and Professional Success, but be warned that it's meant for adults who want to thrive and are comfortable with four letter words.

Easing Into Distance Learning - The First 2 Lessons

Easing Into Distance Learning For Teachers
Sometimes the most important thing in a whole day is the rest we take between two deep breaths.
— Etty Hillesum

This is my fourth post on Distance Learning. You can check out the other three by searching for “Distance Learning” in the search bar on the right. All posts are intended to help make the transition from traditional to completely-online learning easier. Please use the comment section at the bottom to share helpful ideas, tools, and techniques you use.


Monday’s the day hundreds of thousands of Minnesota students are coming back to school. They’re not walking the sidewalks, riding their bikes, getting off buses, nor parking their cars in their usual lot spots. They’re coming and staying at a distance all at the same time - learning from a distance as their teachers teach through screens and empty buildings are replaced by busy minds but hopefully not lagging Internet connections. Starting is hard so start easy. Easy does it.

Easing Into It

At first, I was “just gonna dive into it” like the novel coronavirus-caused hiatus never happened. But then someone smarter helped me see the light.

The images of the first two lessons are below. Click on each hyperdoc image if you’d like to copy it into your Google drive and edit for your purposes.

The First Lesson

The First Distance Learning Lesson

The First Distance Learning Lesson

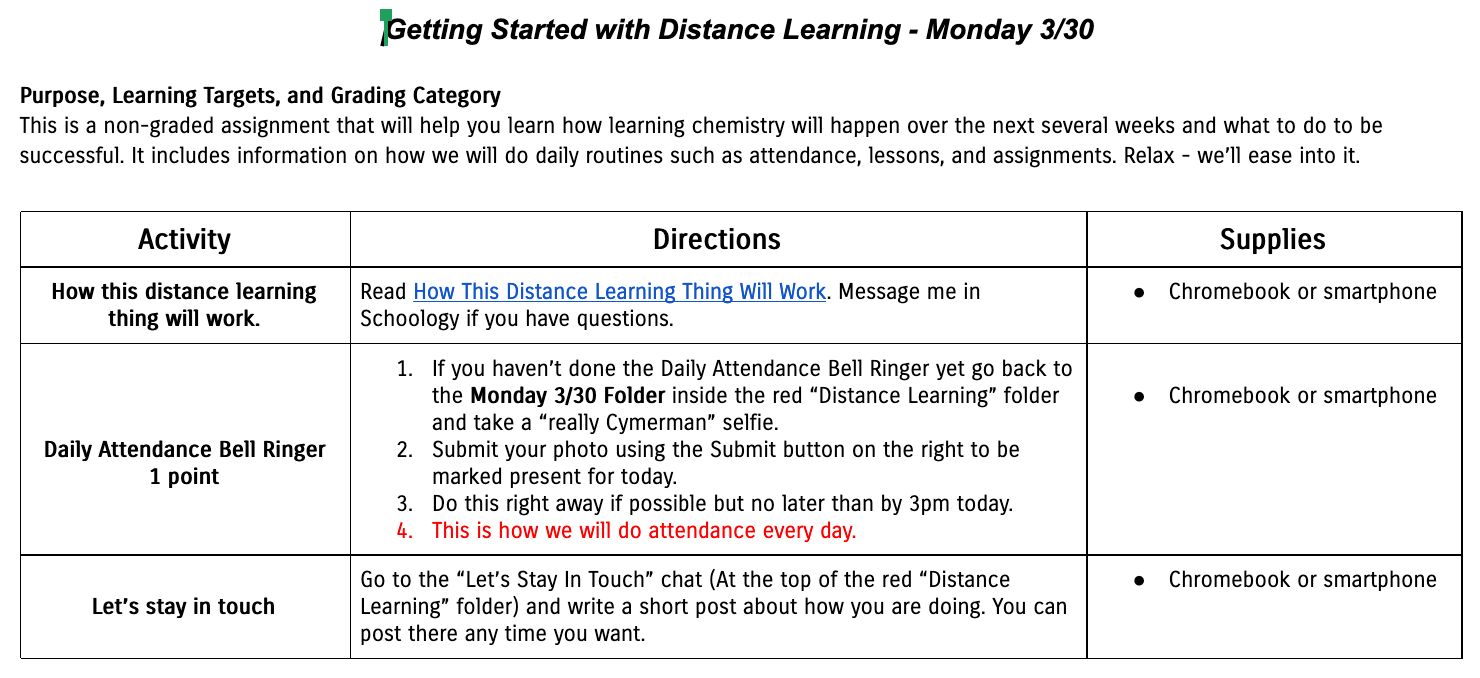
I decided to use day 1 as a chance to do three things.

First, I wanted to help my students and their parents better understand how learning from home will look like. The “How This Distance Learning Thing Will Work” document is a Google doc that contains a list of most important routines, things to know, and how school-home communication will happen.

Second, I wanted to show and practice “doing” attendance. For each day, I created (and will create for all future online learning days) a Schoology assignment that allows student submissions I call the “Daily Attendance Bell Ringer.” For clarity, I will be using the Day, Date, Name format. Thus the first one is named “Monday 3/30 Attendance Bell Ringer.” You can set up something similar in other LMS platforms such as Google Classroom, Blackboard, or Moodle.

Third, I wanted to reach out to and keep in touch with my students so I created a discussion for each class which allows me to see how everyone is doing and provides an additional way to communicate. The nice thing is that I get an email every time a student posts a question or a comment to the discussion so I can respond quickly.

The Second Lesson

My Second Distance Learning Lesson

My Second Distance Learning Lesson

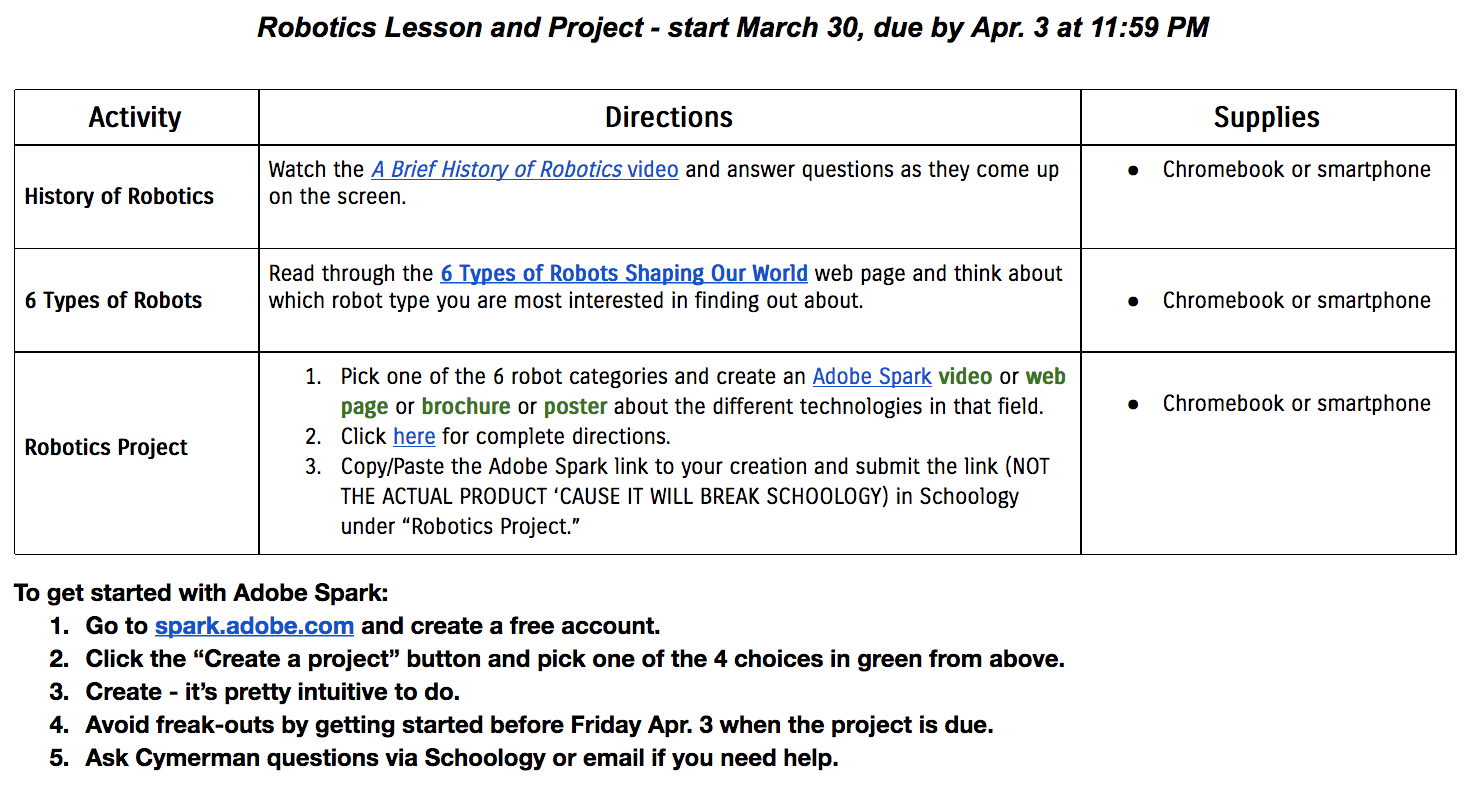
Day 2 gives another chance to reinforce the attendance procedure and an introduction to the three online apps we’ll predominantly use: Flipgrid, Adobe Spark, and Piktochart. I also plan on using Pear Deck, EdPuzzle, and a few other tools but I think three hit the getting started sweet spot.

The rest can be introduced individually during content lessons. Chances are though that you’ve already used most of the tools you plan on using during distance learning in your classroom so they are not completely strange to your students. It is important to note however that first introducing and then scaffolding the totally new tools will lead to fewer hiccups and less frequent headaches. But sometimes you just gotta to rough it.

The Benefits of Starting Slow

  1. Less stress for teachers and students as everyone is given additional time to get used to the new normal before the impending doom of summative work.

  2. Teachers who teach 2 or more courses can use the same lesson plans for the first few days for each class.

  3. Fewer “How do I…” or “Where can I…” questions and a smoother transition to distance learning as routines are established first.

  4. Being a human being?

Key Points

  1. Take at least 2 days to ease into high school distance learning and perhaps longer if students are younger.

  2. Establish and practice procedures and routines and keep some constancy.

  3. Do everything you can to reduce the stress and keep breathing normally.


If you enjoyed this post or found it helpful consider signing up for my newsletter below.

Distance Learning for Teachers: Part 3 - Setting Up Projects

Distance Learning For Teachers - Projects
Clean out a corner of your mind and creativity will instantly fill it.
— Dee Hock

This is the third post in the Distance Learning for Teachers series. You can check out Distance Learning for Teachers: Part 1 - Hyperdocs and Distance Learning for Teachers: Part 2 - Activities here and here.


Let’s be real. While we don’t know exactly how long general social distancing and school closures will last we can use the 8-week CDC recommendation to guess that we need to prepare for about two months of distance learning.

Considering some states (Minnesota is one of them) where infections haven’t even begun to peak and we are likely to see the curve grow exponentially before it eventually flattens, it’s easy to forecast a scenario of 10-12 weeks of distance learning. In a nutshell, we might not open school doors to students for official classes until the 2020-21 school year.

But no matter the state you live and work in, preparing daily lesson plans, communicating with students, parents, and colleagues, keeping records such as attendance, going through assignments, grading, and setting up different online structures to make distance learning work in addition to taking care of our stuck-at-home children will be challenging.

The teaching community will get it done - no question about it. But I think it’s important for our sanity to plan a few learning activities that will lighten the load. Enter distance learning projects.

STEP 3: Setting Up Projects

Here’s what my first distance learning lesson/project for my Principles of Engineering class looks like:

Engineering (Robotics) Distance Learning Project

Engineering (Robotics) Distance Learning Project

During the first activity, students click on the blue A Brief History of Robotics video link which takes them to the video I uploaded to EdPuzzle and added questions to. They watch it, answer questions, and move on to the 6 Types of Robots activity which is a quick reading that introduces them to the types of robots. The main purpose of these first two activities is to acquaint students with the concept of robotics and the types of robots we manufacture.

The project that follows is intended to have them dive in - they might not become experts in all the robot types but by examining one type more closely and creating a digital product on it they will learn the reasons for having robots and the basics of how they are made and how they work. The image below shows the complete directions for the project.

Robotics Project - Detailed Directions

Robotics Project - Detailed Directions

Notice that I differentiated by allowing each student to pick the type of product he or she wants to create (Adobe Spark video, web page, brochure, or poster).

I also gave students a rough schedule to follow. This is something we might normally communicate verbally on a daily basis as students work on the project in class. Although some (read most) students will choose to procrastinate while distance learning, it’s important to still give them some structure they can follow if needed. I think it will be even more important to scaffold learning and assignments while learning remotely.

In addition, I gave them the starting steps to Adobe Spark so they don’t have to wonder about how to get going. Most of my students have not used Adobe Spark before but I am confident they’ll figure it out. Having a concrete staring point will help as it is often the first step that’s the most difficult one to take. Once they start, they will discover that many online apps and tools are intuitive to learn and use.

Funny note: two students already requested access to the document as I mistakenly posted the link as “private.” They’re not even supposed to start until Monday 3/30. My guess is they are getting bored. Let’s give them something meaningful and fun to do.

The Benefits of Doing Distance Learning Projects

Creativity

Learning 21st Century Presentation Tools (vs. creating PowerPoints and Google Slideshows every time)

Learning the content in a fun way?

Less time spent grading and planning daily activities

Key Points

  1. Set up your project with 1 or 2 front-loading, content-rich activities.

  2. Be detailed in your directions and remember to scaffold.

  3. Projects are fun for students and help teachers stay sane (allegedly).


If you enjoyed this post or found it helpful consider signing up for my newsletter below.

Distance Learning for Teachers: Part 2 - Activities

Distance Learning Guide for Teachers - Activities
Don’t limit a child to your own learning, for he was born in another time.
— Rabindranath Tagore

On Sunday, March 15, 2020 Governor Tim Waltz ordered schools to close and gave the school districts two weeks to prepare for distance learning in Minnesota. At this point in time many states have done the same and many teachers are required to transition to some form of distance learning. This post is intended to help teachers in designing and using daily learning activities so students can continue learning from home. It is a follow-up to Distance Learning for Teachers: Part 1 - Hyperdocs which explains the structure I use for setting up online learning in my high school science classroom.

To keep things simple, I will focus on 2 types of activities, front-loading and follow-up or “processing” activities and only on a few tools I use to give you a good start to distance learning. I will also include links to additional resources in the “Key Points” section at the end.

STEP 2: Activities

As I mentioned in my post yesterday, I will stick to daily lesson plans that consist of two activities only - one intended for front-loading the information and the second follow-up activity to allow the students to process the information they are learning by using it immediately. My plan is to keep the entire lesson to around thirty minutes; ten spent on front-loading and twenty on practice.

Front-Load First

The front-loading stage involves delivering content to your students. For example, when introducing the new unit you might use a PowerPoint or Google Slides to give them an overview of what they’ll need to learn over the course of the next few weeks. It’s okay to give them too much at first as long as you don’t expect them to remember everything right away or ask them to produce products that show mastery.

The lessons that follow this initial, perhaps a little overwhelming lesson should focus on one or two (and no more than three) main concepts and their processing. The front-loading activity could again be something presentation-like but it’s important to mix it up and include other media such as web pages, readings, videos, and visuals such as infographics or diagrams.

Notice that in my first “distance” chemistry lesson (image below), I chose to use two front-loading activities: What makes up a solution? and What happens when stuff dissolves?. The first gives students a choice between reading one of the two web pages, which allows differentiation as the chemkids page is more accessible to ELL students or struggling readers. The second involves watching a 4-minute What Happens When Stuff Dissolves? video in EdPuzzle. There are two main concepts I have my students learning: (1) What a solution is and (2) the difference in how ionic and covalent compounds dissolve. I was also deliberate about including some processing during each front-loading activity by asking my students to take notes and including 4 questions for them to answer in the EdPuzzle video. I.f you need help getting started with EdPuzzle click here.

What Are Solutions? Distance Learning Lesson

What Are Solutions? Distance Learning Lesson

However, most of the learning magic happens during the last activity…

Give Them the Opportunity to Process

Follow-up activities are about practicing new skills or using new concepts to learn them. Refer to the last activity in the image above and you’ll see that I chose to have my students compare and contrast salt (ionic) dissolution vs. sugar (covalent) dissolution. Doing so forces them to recall what solutions are and how different types of chemicals dissolve in water. It is important to note that any time a student creates a mental or physical image of a concept he or she will be able to encode it more effectively for understanding and future recall.

Another follow-up activity I use and highly recommend involves Flipgrid video responses (check out Activity 3 in the image below from my presentation at an educational conference in Minneapolis). Ask students to respond to questions or assign each group a topic and ask they create instructional videos. Limit them to 15 or 30 seconds or give them the full 5 minutes.

ImpactEdu 2019 Technology Conference Workshop Attendee Activities

ImpactEdu 2019 Technology Conference Workshop Attendee Activities

You can also use Twitter to keep track of class assignments. Just create a unique hashtag such as #MsJchemZone (does not yet exist) and ask your students to turn in pictures, videos, or typed reflections by tweeting and including the hashtag in their tweets. This will allows them to see each other’s responses as well. Check out #cymdogchem I used in the past.

More Distance Learning Resources

Screencastify - record, edit, and share instructional videos with your students.

Adobe Spark - students can create digital flyers, videos, Instagram posts, memes, collages, web pages, journals etc.

Padlet - students can collaborate digitally by posting to a teacher-created board.

Piktochart and Canva - digital posters, infographics, flyers.

The Key Points

  1. Use 1 or 2 front-loading activities to deliver content and try to keep it to 10 minutes. Include some processing if possible.

  2. Give students the opportunity to process the information by using it. Ask them to summarize, draw, post to a discussion, record a video, make an infographic etc.

  3. Keep it simple - Stick to 1 to 3 concepts and have students dive into them to (hopefully) achieve some deeper learning and stick to a few apps to ease your and your students transition into the uncharted waters of quarantine-induced distance learning.


If you enjoyed this post or found it helpful consider signing up for my newsletter below.

2024 Crush School